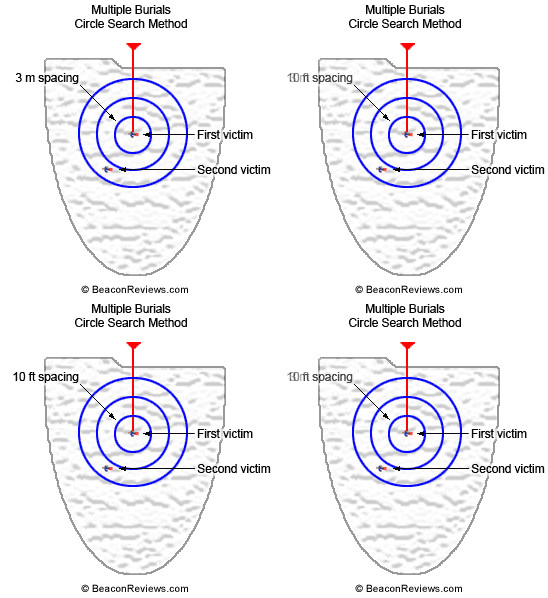
The expanding circle technique works well and is relatively easy to learn. The disadvantage is you must cover a lot of ground and walk uphill to complete the circles.

In the above illustration, the red line represents your initial coarse search path to the first victim. You would then move 3 meters from the victim and circle the victim as shown by the smallest blue circle. As you walk around the victim on this 3-meter circle, your transceiver will continue to point to the first victim and display a distance of approximately 3 meters.
After completing the first circle without a significant change in the displayed distance, you would enlarge the circle by 3 meters. While walking on this second circle you should expect the distance to be approximately 6 meters (because you are now ~6 meters from the first victim). (These references to the displayed distance are approximations; you're really looking for unexpected changes in the displayed distance.)
In this example, as you get closer to the second victim than the first, the distance displayed on your transceiver will drop from the expected 6 meters down to approximately 1 or 2 meters. Depending on your transceiver, you may hear a change in the cadence of the beeps when your transceiver locks onto the new transceiver. You should then use the fine search technique to locate the second victim.
The distances displayed by your transceiver in this example, i.e., 3 meters when on the 3-meter circle and 6 meters when on the 6-meter circle, are very rough estimates—don't take them too literally. Mathematically, the distance would also include the depth of the first victim and, realistically, the distances displayed by avalanche transceivers aren't that accurate and will vary as the alignment between the antennas change. It's more important that you watch for a significant decrease in the distance (and possibly a change in the direction indicator). It's critical that you understand the concept of the expanding circle technique which is that by making 3-meter circles, at some point you will end up much closer to the second victim than to the first.